Summary: It cost about 5.5 grand and 40-50 hours of work. Much longer time waiting for parts than installing. Wiring DC connections is easy. Wiring coaxial connectors and tiny wires is more frustrating.
Introduction
This project started with a desire to add an autopilot, an AIS, and while I was at it, a chartplotter. I had a need to revise my helm ergonomics. Got great advice from the forum. I designed my system, at least how I thought I would install things. The fixed hardware came in and was good quality. I modified my new pedestal guard. The sailing NavPod instrument housing I bought was good quality. I started removing old wires and pulling some new ones.
I built a new dashboard panel for my Nav station. I re-formulated the pedestal feet hull penetrations. Then I finally was able to get things put back together and wired in.
Here was how I thought I would install everything:
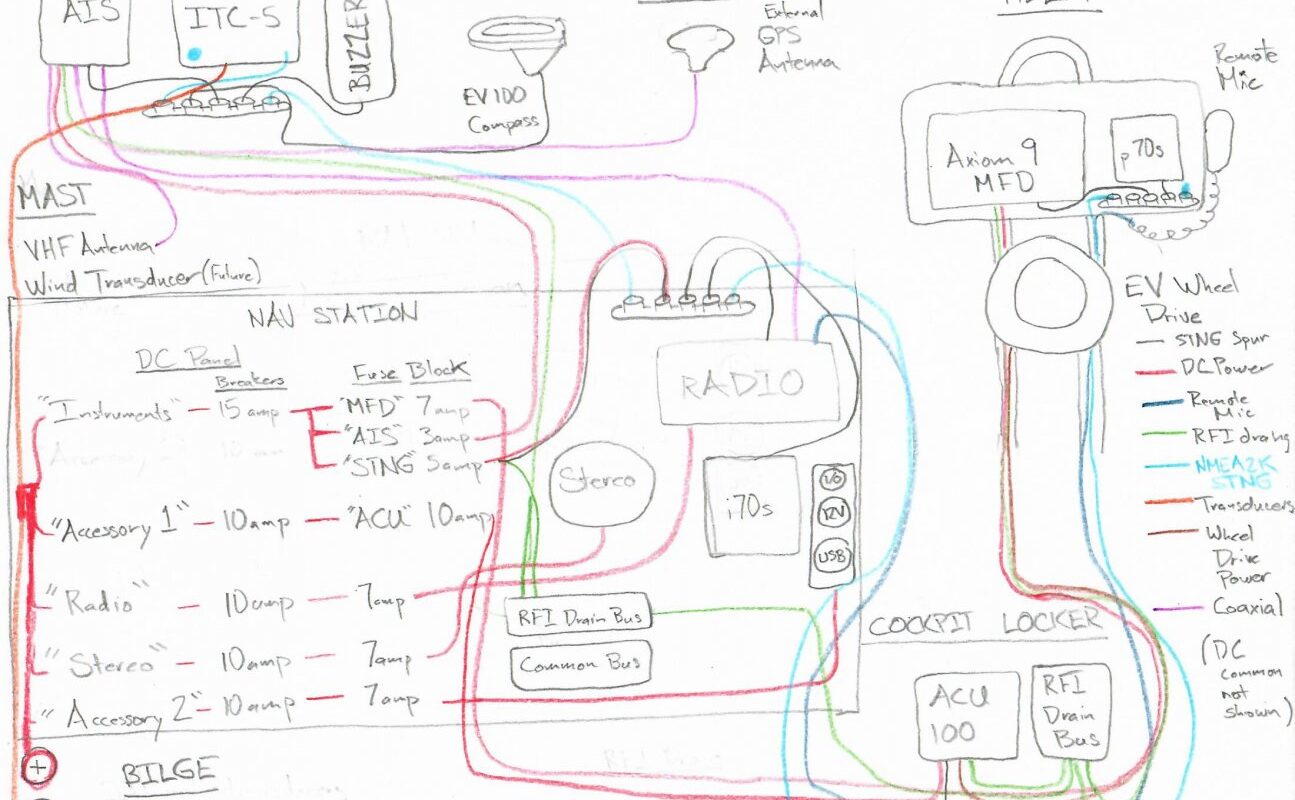
I decided as the process went on that it did not make sense to locate gadgets in the double quarterberth below my helm. I thought about swapping out fuses and checking LED status lights etc., and it just made sense to be able to do as much of that as possible from the Navigation station. So, I moved as much as I could to the Nav Station Panel and the adjacent cubby on the starboard side, my new “Server Room.” My (ahem) diagram of the system as-built:
“Well doesn’t this make everything crystal clear….”
It’s also simpler to run power to all the new devices. Removing some old electronics (cassette player, Loran module, afforded enough space that I could fit in all of my new stuff with relative ease. As I received the boat, the panel was affixed to the hull with six SS screws. I knew I would be pulling and replacing the panel multiple times for testing etc, so I installed slide-lock latches in the corners along with some receiver stiles at the base to provide the lock in portion. I bought the latches and had to modify one to make it fit properly, but it has worked well so far. The wooden dashboard panel can be disassembled and removed from the boat while leaving all of the AC/DC panel wiring in place. I consider this an improvement.
New Nav Station panel with SS latches in four corners for easy removal, new gadgets
The only AC work I did was to replace the GFCI receptacle with the new dash panel. The line and load had been reversed on the old one, and I puzzled this out after 10-15 minutes. Easy-peasy, and resolved a noted item on my purchase survey.
Compared to its slightly older fraternal twin the 32-3, the Ericson 32-200 electrical panel is I think ‘easy’ to work on. The main battery switch (at least on my boat) is located at the rear quarter-berth leaving only small-diameter DC wires in back.
I had to drill a decent sized hole in the sidewall separating the Nav Station wiring from the adjacent cubby, but that was easy and it provides a tidy extension of the station area. The dutiful gadgets will be hidden behind sliding rattan cane doors. This is a work-in-progress photo
“Server Room”/Cubby to house non-screen gadgets – The ACU moved below decks later
I had some issues with some of the Raymarine stuff having a third “RFI drain” wire and I wound up installing a separate grounding system to connect these. The AIS, SeatalkNG network power wire, ACU-100 and MFD all have RFI drain wires and they connect to a bus in my cockpit locker which ties to my common grounding point between my engine block and negative starter battery post.
Pilot control unit and RFI Drain wire bus in starboard cockpit locker. Wires subsequently tidied.
I don’t grasp enough about radio waves to understand how the third wire solves frequency interference problems. I know if you are using single side-band radio over very long distances, you want zero radio interference. Most of my gadgets came with ferrite cores that one is meant to clamp over the wires. I haven’t installed the ferrites, but everything seems to work fine. Do I have more static on my VHF radio than I would otherwise? Not sure.
I read some oblique reference in the Raymarine forum that implied that the RF drain wire may be there so that the Raymarine gadgetry meets a European union standard, but that’s my conjecture now. I’ve seen a number of Youtube videos where people just wire the RF Drain wire to the black negative/common/ground wire system without any apparent ill effect, though this seems like a half-baked solution.
I also learned that my boat has a prop shaft brush installed. I relocated the end of the wire to the common ground location. Thanks to Tin Kicker for some guidance.
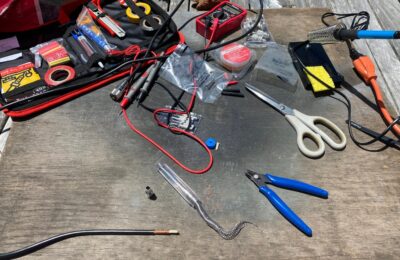
I bought lots of connectors and tools on-line, for cheap. For forensic work, a Sperry Wire Tracer is helpful. You can clip the leads onto a given wire in a faraway location, and see which is the corresponding wire it is in your nav station panel if there is any doubt.
I was able to re-use two different original circuits and avoid pulling new power wires to the helm. These were copper core (non-tinned) wire circuits serving the helm. Any new wires I pulled were tinned, but now that I know where everything is and how it works, if I ever need to replace the non-tinned wires, it will be child’s play.
Given the loads I was placing on the circuits, it made sense to switch the breakers. I swapped the “Instruments” from 10 to 15 and “Accessory 1” from 15 to 10amps. Other than fiddling with the small screws, this was straightforward. The 32-200 has a Newmar panel with Carlingswitch breakers. These can be found on eBay – it’s not clear if new ones are currently made, though (knock on wood) I don’t seem to need any.
Holding short screws in awkward positions behind a reversed panel in a shadowed nook requires one to resort to comical tactics. Blue tape was a project necessity.
When I had everything connected (the SeatalkNG network, the new radio, stereo, charger ports etc.) and I flipped the power switch, IT ALL WORKED. Like magic. Every ring terminal I crimped on, every butt-splice joint, crimped or heat-soldered on, connected and worked. Miraculous. The i70s, p70s, and Axiom screens came on.
In truth, I had a problem with powering the stereo but it was easily resolved and I will elaborate in a later post. Connecting the coaxial lines has not been as easy. That too will be part of a later post.
Budget
Here is how much everything cost in dollars and (probably under-estimated) time. Because I bought my boat through a broker, as a perk I was able to use the broker’s ‘Harbor Supply’ wholesale discount at West Marine for a period of 90 days. I got 15% +/- off retail prices for most of the Raymarine stuff, which added up. I also sold off some of my old equipment on eBay to recoup some costs.
| Electronics upgrade budget | |||
| Item | With Discount | Installation hours | |
| Removing old wires & equipment | 0 | 3 | |
| EV100 Pilot Package | West Marine | 1308 | 5 |
| –ACU 100 Controller | |||
| –Wheel Pilot | |||
| –EV1 Electronic Compass | |||
| –p70s Control Head | |||
| –Various SeatalkNG connectors | |||
| Raymarine Transducer Pack | West Marine | 1051 | 3 |
| –ITC5 Transducer converter | |||
| –DST 800 Hull Transducer | |||
| –Wind Instruments Transducers | |||
| Axiom 9 RV MFD | West Marine | 1038 | 1 |
| Raymarine AIS700 Transceiver | West Marine | 858 | 1 |
| –External GPS Antenna | 3 | ||
| Raymarine External Buzzer Alarm | West Marine | 130 | 0.5 |
| RM Seatalk Network Components | On-line Retailer | 100 | 1 |
| USB/12V Accessory Receptacles | On-line Retailer | 1 | |
| Dashboard Panel (Plywood) | Home Depot | 25 | 4 |
| Navpod Instrument Housing | West Marine | 350 | 1 |
| Navpod Pedestal Guard | West Marine | 225 | 3 |
| Edson Pedestal Feet | Edson | 83 | 3 |
| Edson Pedestal Plate | Edson | 127 | 0.5 |
| Standard Marine GPS1850 Radio | On-line Retailer | 218 | 1 |
| Standard Horizon Flush Mount Kit | On-line Retailer | 18 | |
| Ram3+ Remote Microphone | On-line Retailer | 120 | 0.25 |
| Remote Mic Extension Cord | On-line Retailer | 25 | 5 |
| Planet Audio | On-line Retailer | 95 | 1 |
| Various Connectors, Wire | On-line Retailer | 120 | |
| Various Tools | On-line Retailer | 100 | |
| Total Expense | 5991 | 37.25 | |
| Sales of unneeded items | |||
| Pedestal guard & Plate | Ebay | -75 | 0.5 |
| St4000+ Wheel Pilot Control + Compass | Ebay | -100 | 0.5 |
| ST50 Instruments & Cables | Ebay | -200 | 0.5 |
| DS800 Triducer (never installed) | Ebay | -150 | 0.5 |
| Total Income | -525 | 2 | |
| Net cost of upgrade | $5466 | 39.25 |
Conclusion
If I was ‘only’ going to day sail my boat in the San Francisco bay and had no aspirations of going offshore, the smart thing for this upgrade would have been to buy a new-old-stock ST4000 wheel drive on eBay. All of my other old stuff worked – I think a PO had burned out the wheel drive and it would have been much quicker and cheaper to buy a drive (+/- $400) and bolt it in to see if it would go with the existing control head etc.. Could have run navigation with an iPad and a GPS puck wireless antenna. Probably would have been fine to go offshore too. Could have added a separate AIS. But well, now I have the latest and greatest and I know how it all goes together, and I can see my instruments on my helm. Progress.