So after cleaning and polishing my mast while it was out at the boatyard, today I was able to install the Tides Marine Sailtrack.
I linked to this guy’s video before – I really just followed his example:
My installation took about 2.5 hours.
My first step was to open a new gate in the mast. At first I was worried because the position Tides Marine requires (10″ above the gooseneck, at least 3″ long) made me worry that I would be forced to stack sail slides much higher up on my mast and wind up with 20″ dog bones for reefing etc.). That did not happen as the track gate winds up being covered by the Sailtrack and the slide entry point is below the track gate.
Scalpel and patient. Patient is lashed to the operating table.
After initial passes with the angle grinder, I rounded out the corners with my fancy $18 Rotary Burr File bit I bought for opening up my pedestal guard. It worked very well.
Finally I cleaned the aluminum shards out the luff groove with my Ryobi dustbuster. Do you have the mini-vacuum in your bag of Ryobi? I recommend it for boat use. Last, I cleaned out the edges with another fancy wire brush drill bit I just bought on Amazon. The intended use is to make smooth my spreader tips for my replacement standing rigging. The bit worked well.
Here’s the thing. You can make this newly-fabricated track gate as pretty as you want. Nobody will ever see it though, because the track will hide it. As long as you can slide the plastic sail track through the gate, you’re good.
After your have your gate in, you’re supposed to use the test slide that comes with your kit, to verify that it will travel up and down the luff groove easily. I did that and it worked, so I started stuffing in the real track:
I ordered the track a bit too long (intentionally). You don’t want to overdo it, because Tides prices your kit by the foot. You want the top of the track to land 1.5-2″ below the masthead.
Measure how much excess is at the bottom. I had about 11″ extra.
The bottom of the track has more specialized cutouts and modifications, so one is to trim the excess from the top. That means yanking the whole thing out of the luff groove. My fit was fine, so other than the 37′ plastic extrusion flopping around, this was easy. I got a nice trim with my PVC pipe snippers.
Add back a pin stop point for the top of the track. This pin exists so you (or the wind) don’t huck your main sail out of the top of the track in a fit of easy-sliding enthusiasm. It’s probably overkill. It is suggested that you drill your 1/4″ bit through the track using the lower slide track stop as your template.
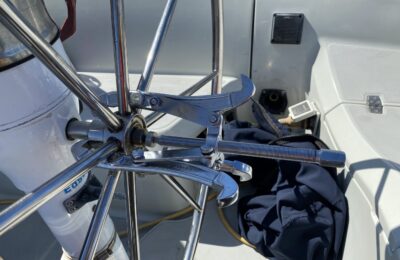
How does the super-slick track stay in place on your mast?
With two screw-in stops with backer plates that are located near the slide exit at the bottom end of the track.
You fiddle the backing plates into your groove with some long screws:
Then tighten them up and put the slide stop on the very bottom. You’re good to go. From this final picture, you can (can’t?) see that the new track gate that I hacked into the mast is complete covered up by the black shiny plastic track. LIKE IT NEVER EVER HAPPENED. Also, you can see that the new entry point for the slides (under the Tides Marine metal box) is only about an inch higher than the factory slide slot in my luff groove visible just to the right. I haven’t increased my dog-bone height substantially (thought the Tides slides may be fatter than my old plastic ones).
Now I need to attach my fancy new slides to my sail. I may have a loft do it, or attempt it myself if I am feeling nautical, once the rest of this haul-out is complete.