Summary
I recently installed a new power supply system for my sailboat utilizing lithium batteries and a new alternator. The total cost was about $3,500 and it took me about 30 hours to install everything, which was mostly making lots of wires and cables and running them through difficult to reach parts of my boat.
Introduction
After I reviewed my existing power supply system, gave some thought to what kind of a replacement system I wanted, I chose a range of products I thought would work well.
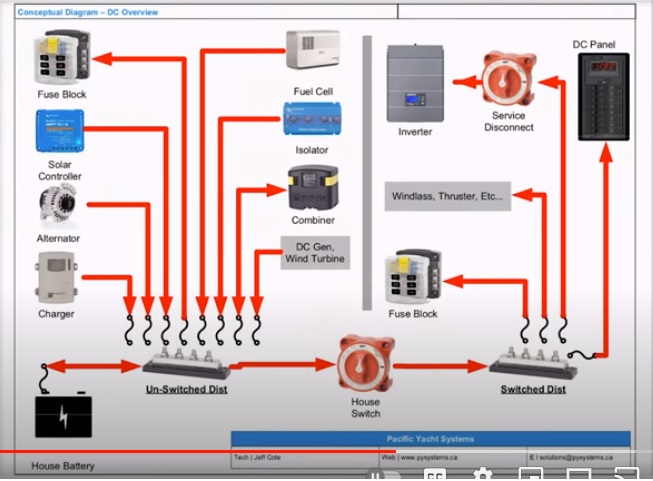
To try to envision how everything would fit together, I borrowed a schematic from a YouTube video by Jeff Cote of Pacific Yacht Systems. Here is a concept drawing from one of his talks. Notable is the absence of any starter battery or starter.
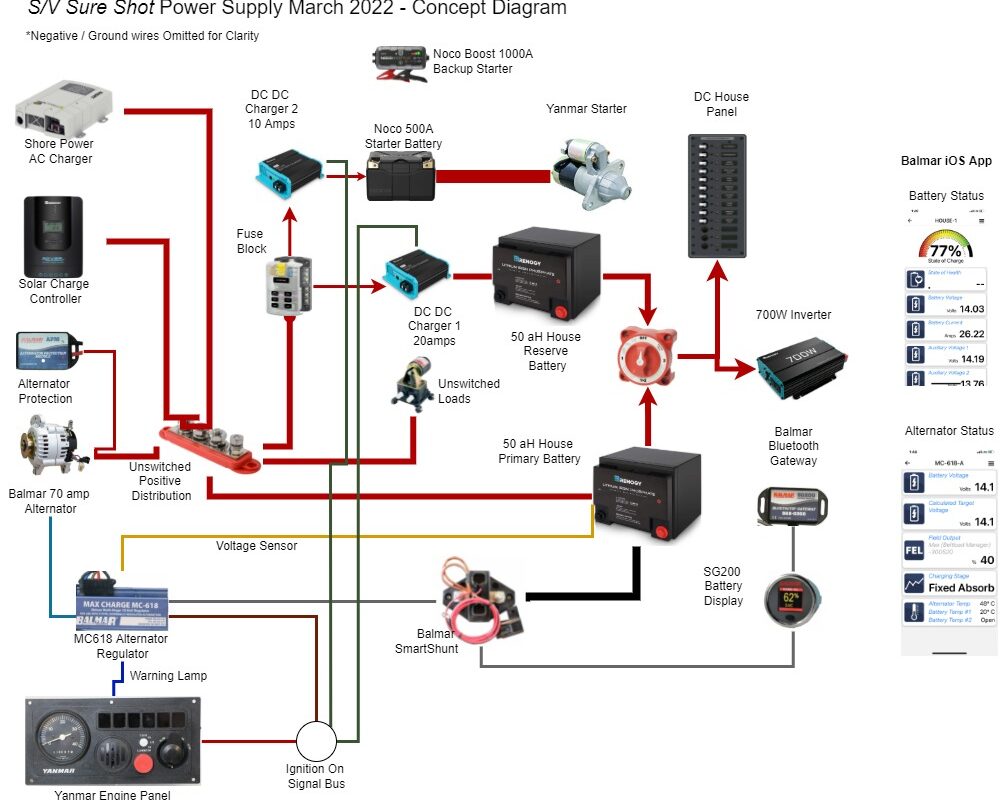
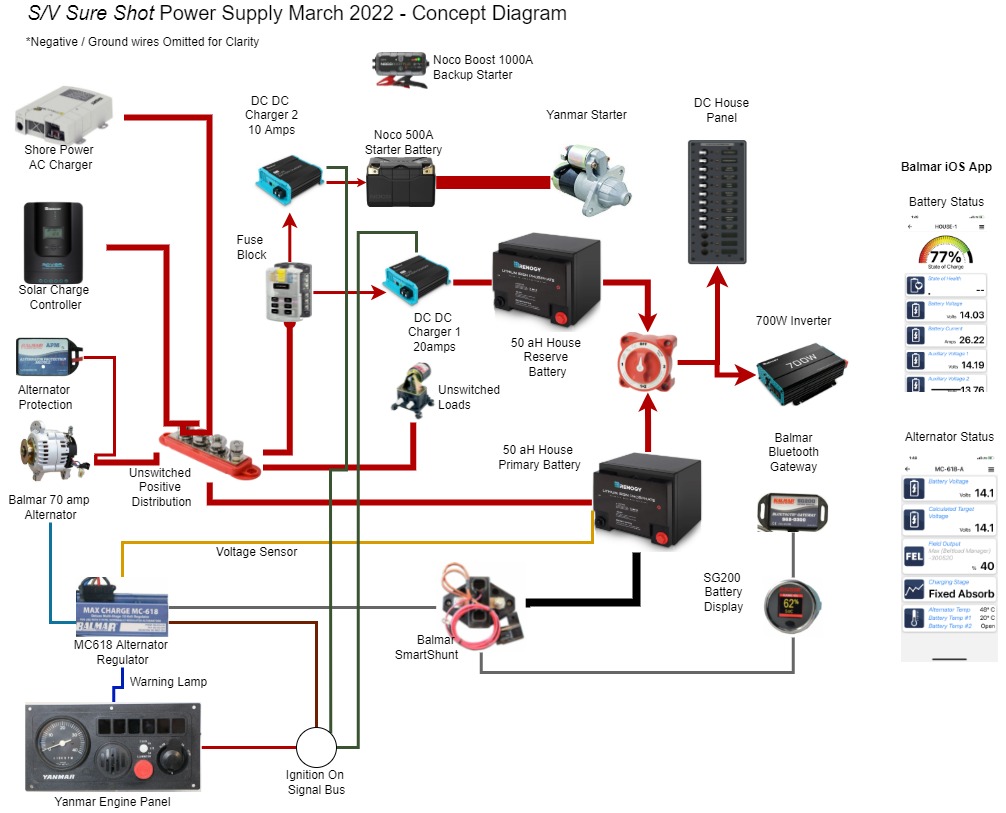
I came up with my own more elaborate related diagram, though with less of an emphasis on switched vs. unswitched.
How The System Charges Batteries
Electricity is stored in three batteries, a house primary battery, a house reserve battery, and a starter battery. Sources of charging power include the alternator, a solar panel system, and a shore power AC/DC charger. All of the sources of power arrive at a shared Positive Distribution post. The principal recipient of electricity is the house primary, and the alternator regulator, solar controller and Shore Power charge controller are set to optimize the charging of this battery.
DC DC Chargers
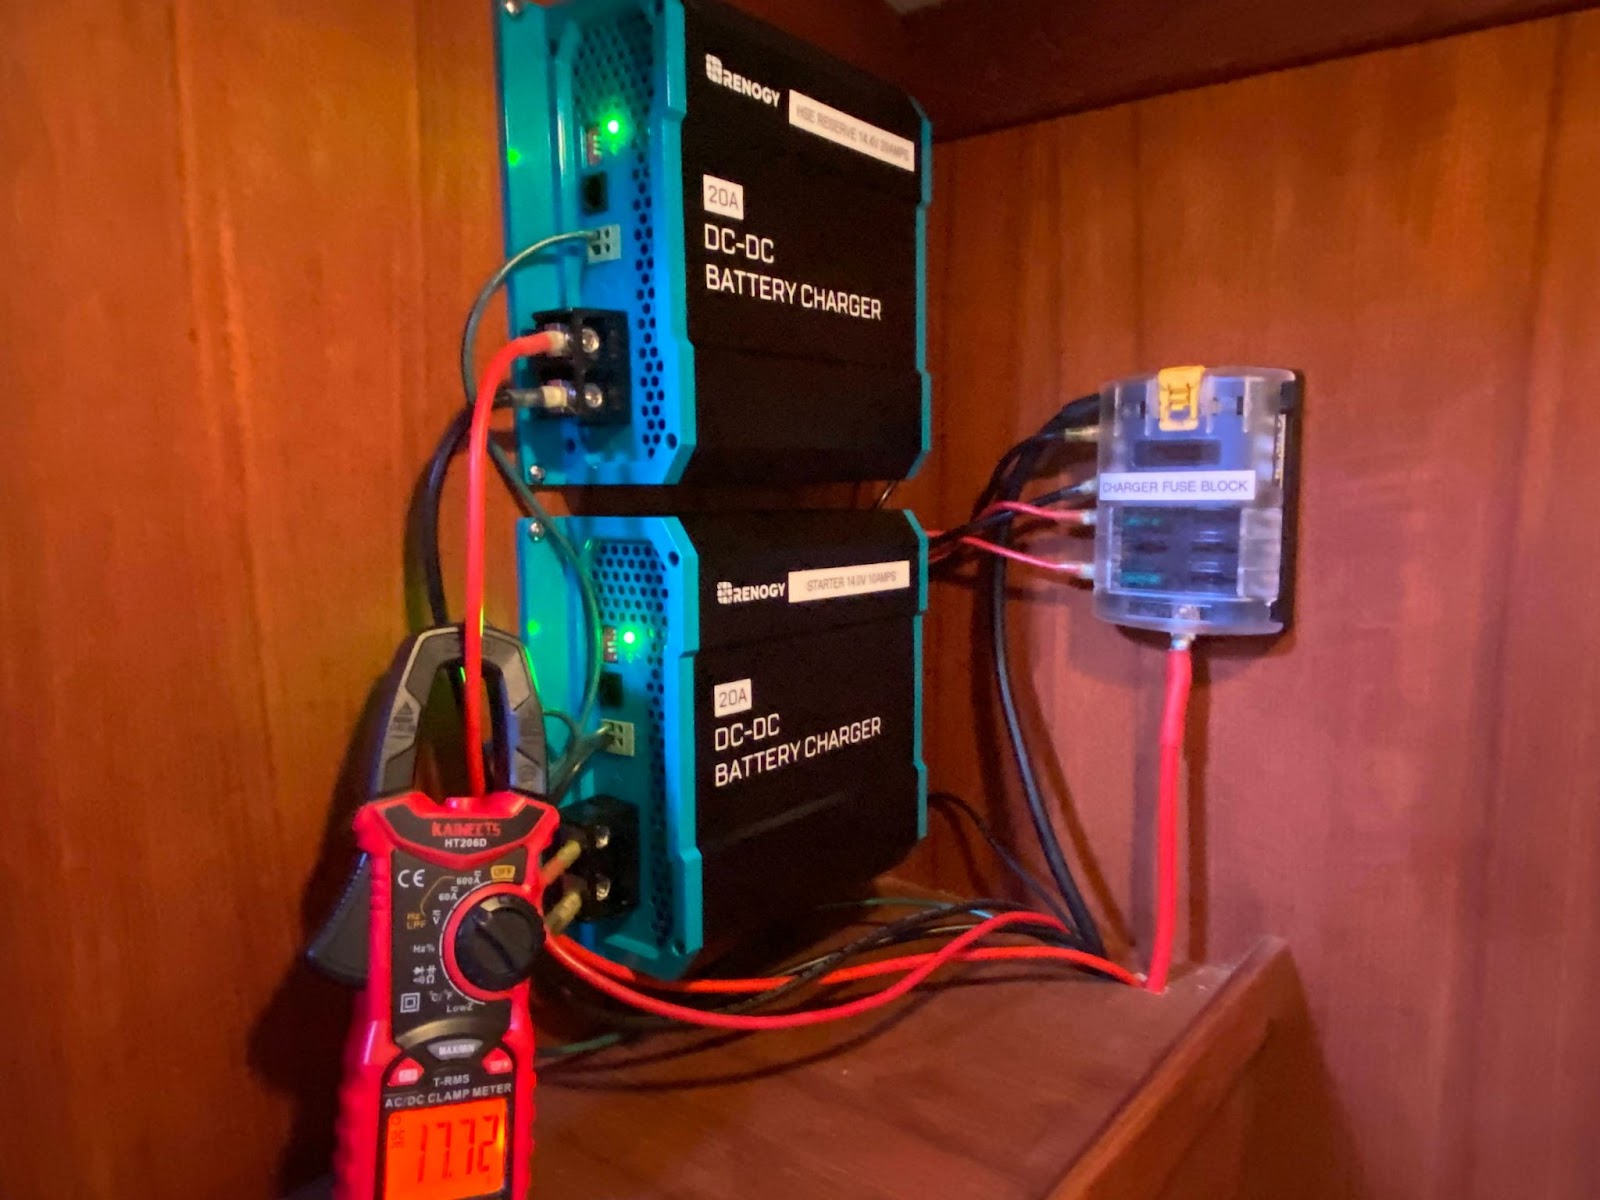
The starter battery is connected to the positive distribution post via a DC/DC charger. The NOCO starter battery wants to be charged at no more than 12amps at 14.1 volts. I have configured the 20 amp Renogy DC/DC charger to charge at 10amps at 14.0 volts. The next step up is 14.2. The starter battery cannot be switched to charge directly from the alternator but instead always receives charge via the DC DC charger.
The house reserve battery is not directly connected to the positive unswitched distribution post. Instead, like the starter battery the house reserve is charged via a DC DC charger. The Renogy 50aH battery wants a charge voltage of 14.4 volts, at an optimal charge not to exceed 10amps (a 0.2 “C” level). I have left this charger set at 20amps maximum to allow for rapid charging, though this choice may shorten the life of my battery.
The DC DC chargers are designed to operate only when the engine is running, so that the chargers do not constantly siphon energy from the primary battery. To achieve this state, the installer must run a voltage carrying signal wire to the chargers from a source (such as the engine control panel) that turns on with the ignition. See “ignition on signal bus” in my system diagram.
I located both chargers in the rear double-berth of my boat. The chargers receive power via a shared Blue Sea fuse block.
Alternator Installation and Wiring
My initial plan had been to retain my existing alternator, which I thought was a stock Hitachi 55amp unit. This assumption was made in ignorance because I couldn’t read the specs on the alternator without removing it from the engine, and I didn’t want to tear down my system in advance. In retrospect, disassembling everything in advance would have been the right way to go.
In any case, I learned that I already had a 108amp alternator (AMP Tech). Some previous owner had added it. The interior was fairly blackened with belt dust. I took it to a local alternator shop (Rite Way Electric, on 6th Street in San Francisco) in that fun part of town where shops that do stuff in the physical world stand a few hundred feet from towers of glass and steel where people shuffle symbols on computer screens.
It would cost $200 to clean/rebuild. A new Hitachi 55amp (for which I had designed) would cost $550 if ordered from the shop guys.. I could have purchased a no-name Hitachi part number equivalent on Amazon for $100. I waffled.
Knowing that I would be ordering a Balmar alternator regulator (the MC-618) I decided to order a new Balmar regulator too, thinking it would make the installation easier to understand and set me on my way with a brand new unit. I thought I could keep my old alternator as a backup.
I bought most of my Balmar components from a shop called PKYS (Peter Kennedy Yacht Systems) in Annapolis Maryland. They have good prices on Balmar stuff and Peter has taken the time and effort to make some explanatory videos on YouTube.
PKYS has a strict return policy compared to big internet retailers. ‘Your unit must be in PRISTINE condition.’ This is very reasonable when selling complex parts to uninformed DIY boat guys like me. So, order carefully, and be prepared to pay a re-stocking fee if you order the wrong thing.
To buy the right alternator one needs to know:
- How the alternator attaches to your engine. My Yanmar has a 3.15” ‘saddle’ mount.
- What belt drive you have/need. My impression is that most sub 40’ sailboats with 3 cylinders or less have a single-vee belt. Alternatives include double vee belts or serpentine belts to deal with greater loads.
- What amperage you want/need. The most common Balmar alternators sold are the white ones (the 60 series) and come in 70amp and 100amp types.
I was somewhat flummoxed to learn that the 70amp alternator I bought produces 100amps very willingly. It comes with a test sheet from the Balmar production facility that states as much. I enquired with PKYS about this and their response was effectively, “Yeah, this happens. The regulator knows about voltage but not about current.” The situation suggests that Balmar might sell the same alternator with two different stickers and SKU’s – one that says 70amps and one that says 100amps.
One can dial-back the current output by using a setting in the alternator regulator called the belt-load manager. This is what I have done to ensure I am not offering out too many amps at one time.
As for the physical installation, the challenge is to ensure that the alternator is mounted with appropriate tension for the belt. This is achieved traditionally by lifting up on the alternator housing with a large screwdriver or pry bar and tightening a location bolt at the same time. There are plenty of YouTube videos on how to do this. It turned out to be less difficult than I had feared.
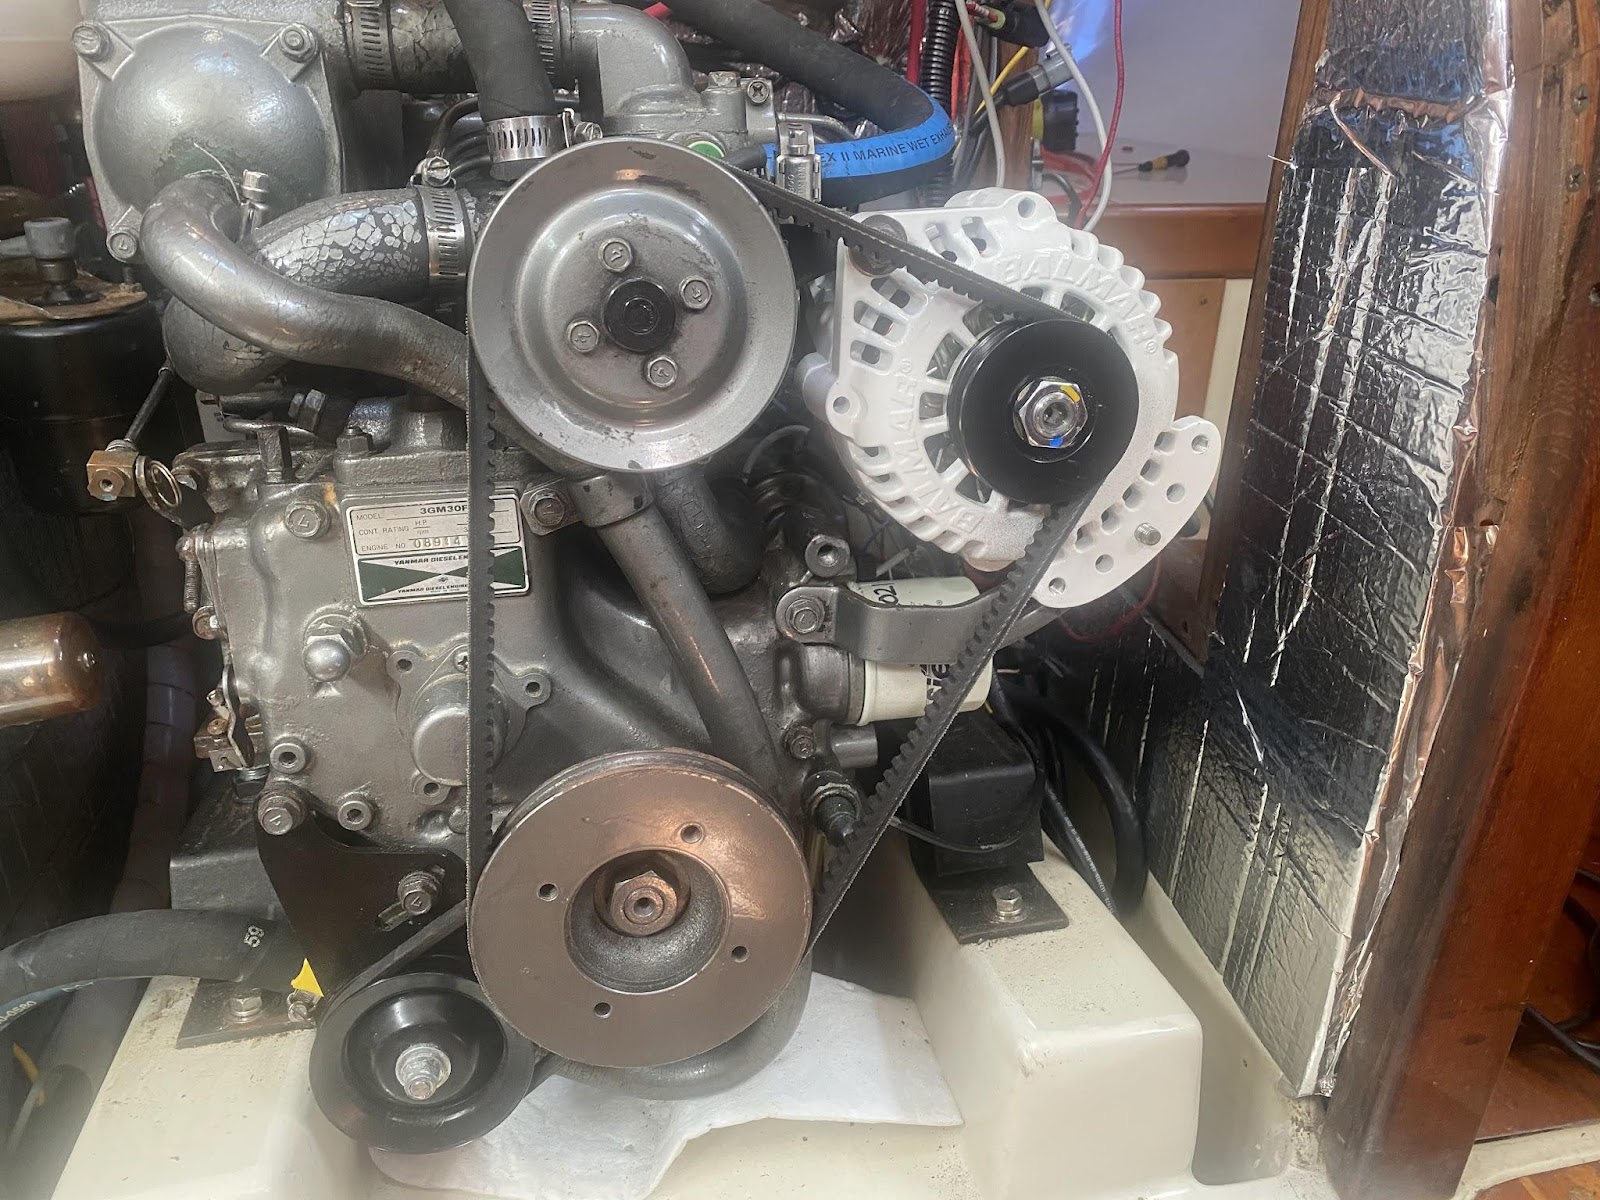
One other issue I wondered about was if the diameter of the alternator pulley (vs. the diameter of the crankshaft pulley) mattered at all. Would I be obliged to order a correct pulley diameter? My conclusion is, based on the performance chart that came with my new alternator, pulley ratios don’t matter very much. Above a minimum operating rate, the alternator produces roughly the same amount of current at many RPM ranges.
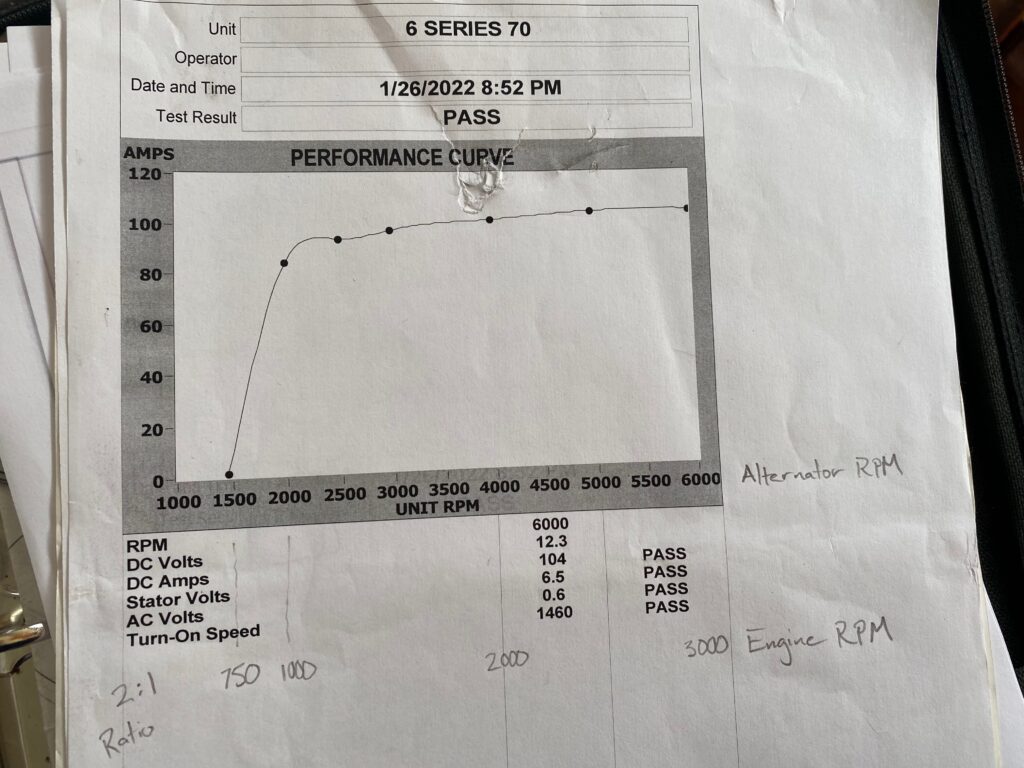
With my crankshaft and alternator pulleys there is a 2:1 size ratio, as long as I am running the engine at 1100 rpm or higher (2,200rpm on the alternator), that translates to good amperage output.
Alternator Regulator
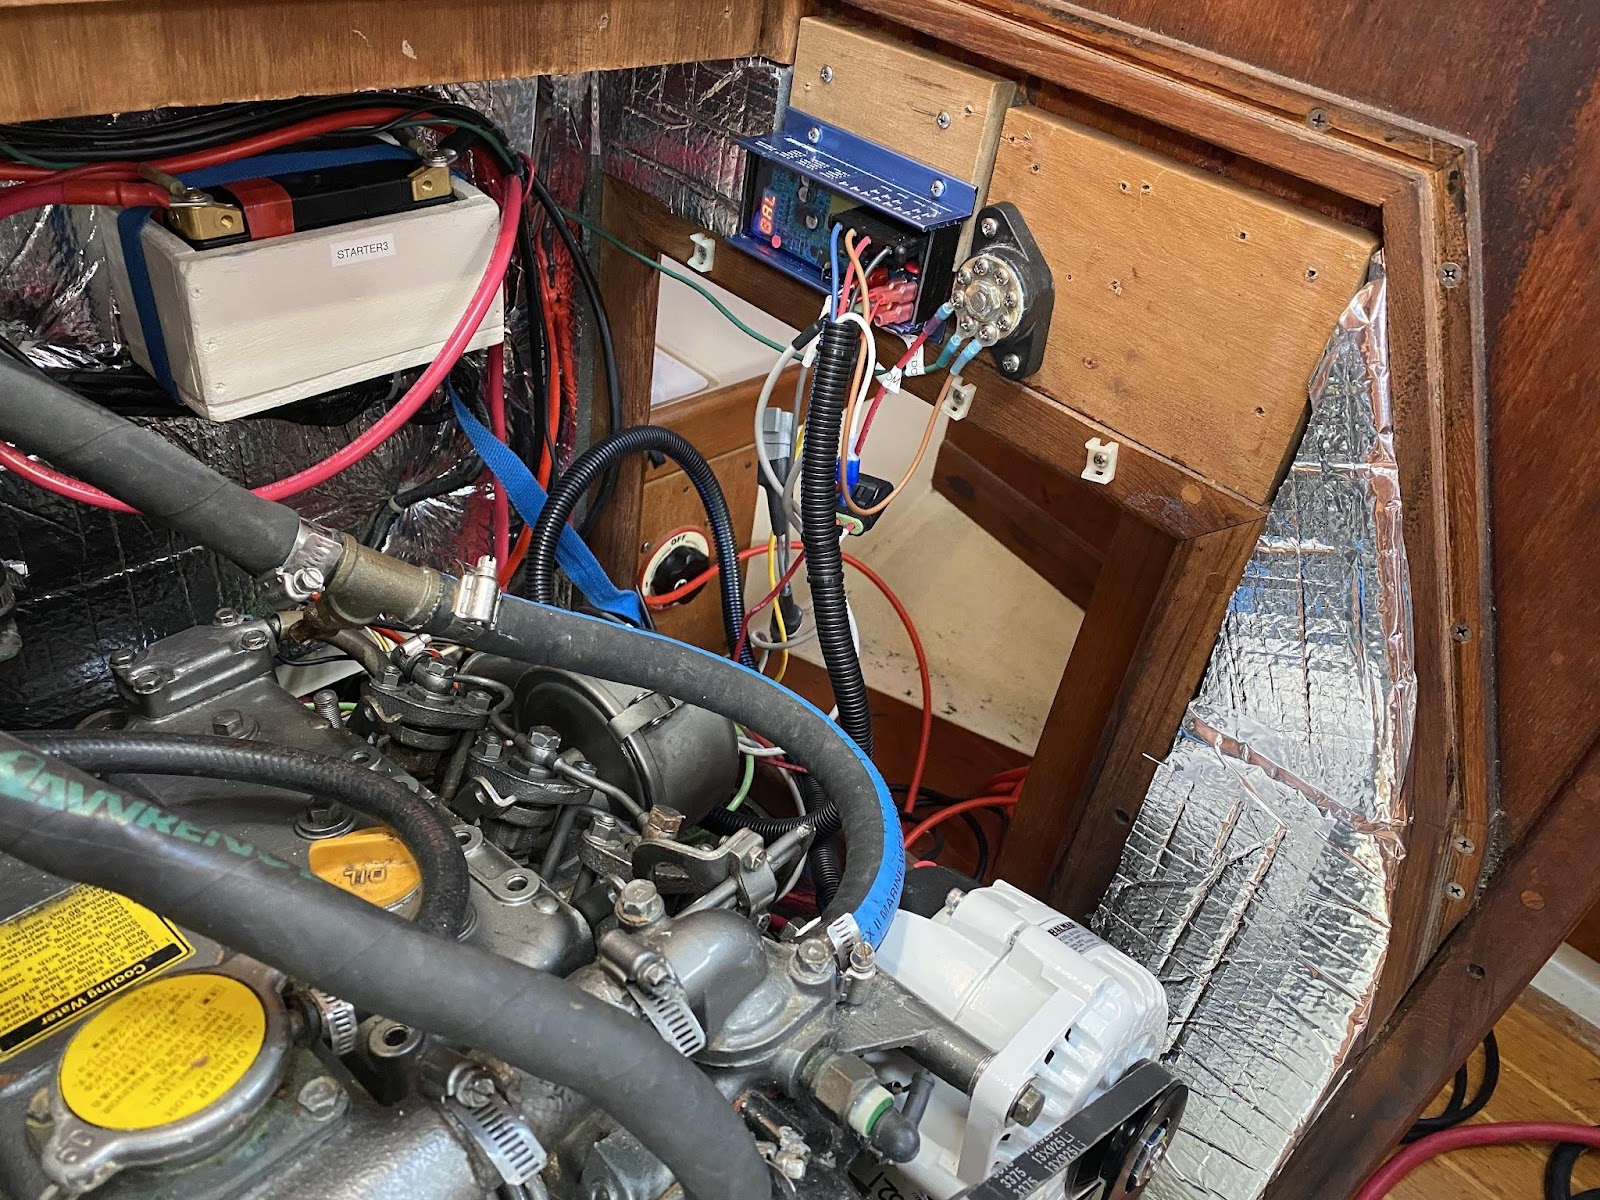
I placed my new Balmar MC618 regulator in the engine compartment in the same spot from which I removed my inherited predecessor regulator. I’m planning a separate detailed post covering the regulator installation and programming. Here’s the location, wiring to be completed and tidied:
Battery Location and Security
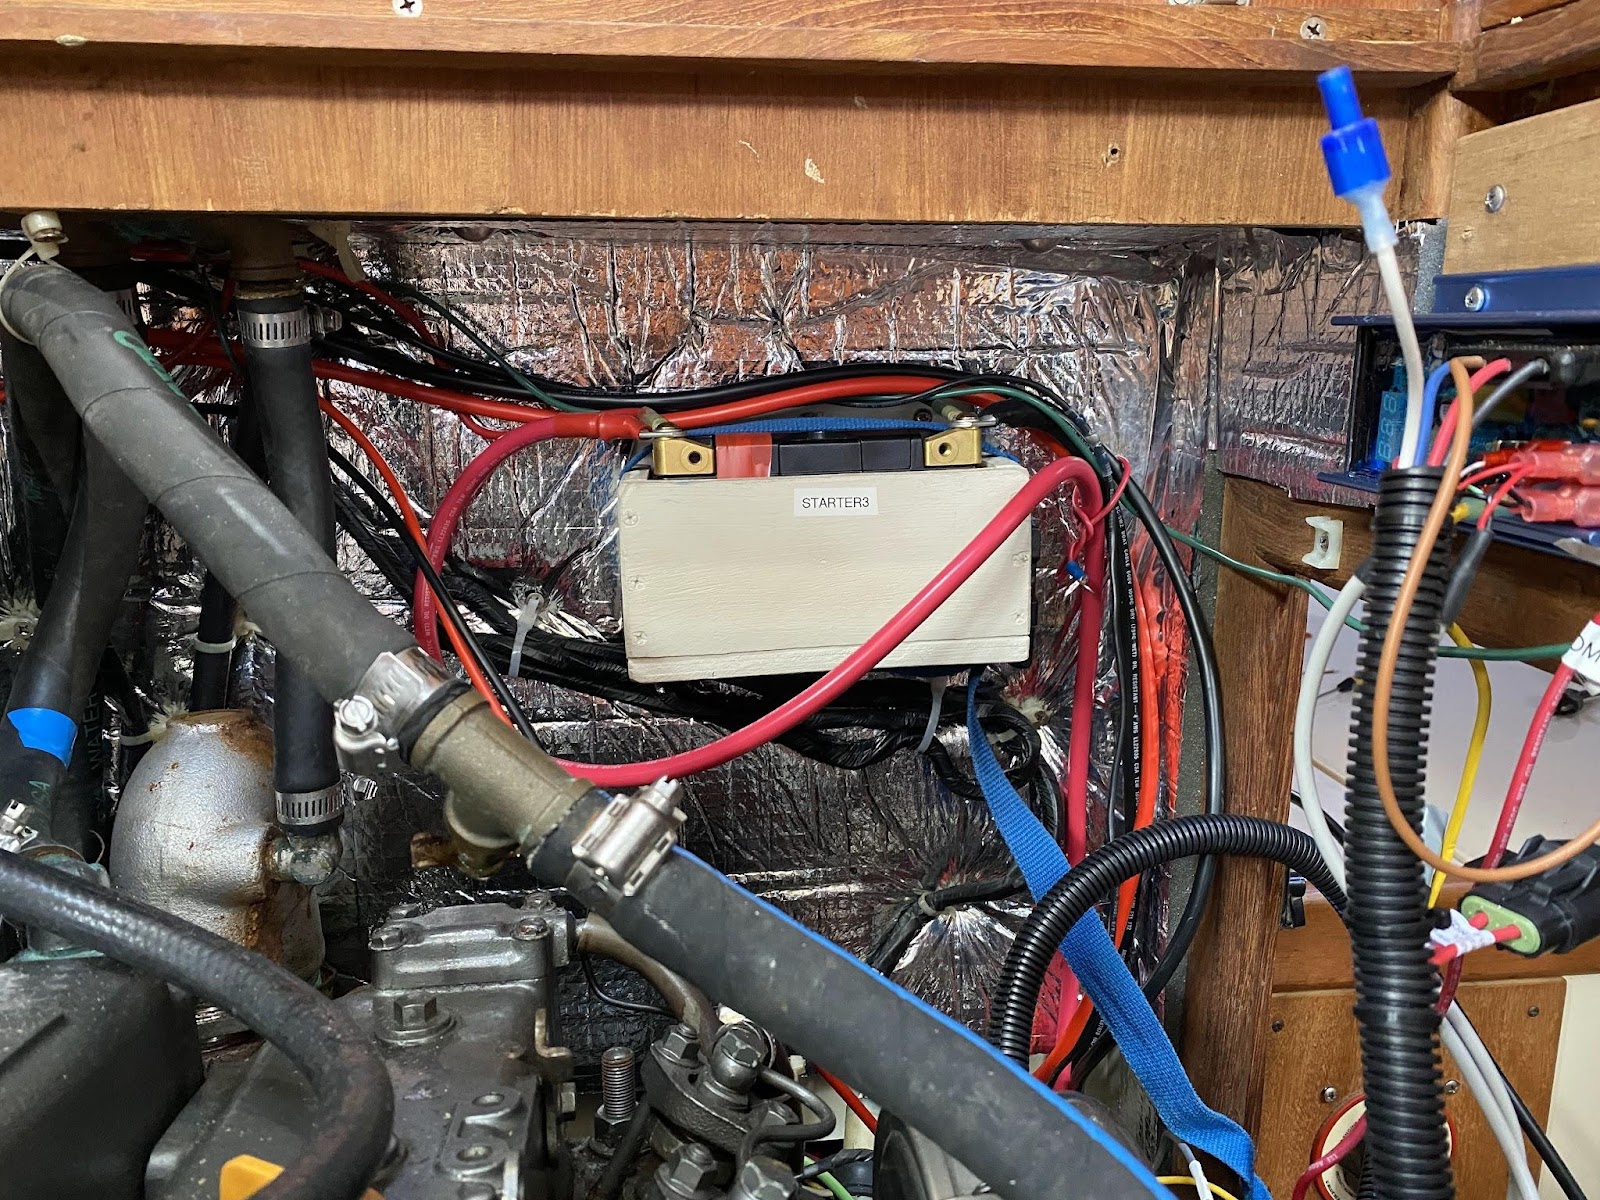
I initially planned to put all three of my batteries into the compartment under my quarter berth. I think I still could have wedged all three in, but I opted to put my small starter battery in the engine compartment, (just like the battery location under the hood of every car I have ever driven.) I built a small box and bolted it into the rear of the engine compartment. The battery is the size and nearly the weight of a loaf of banana bread.
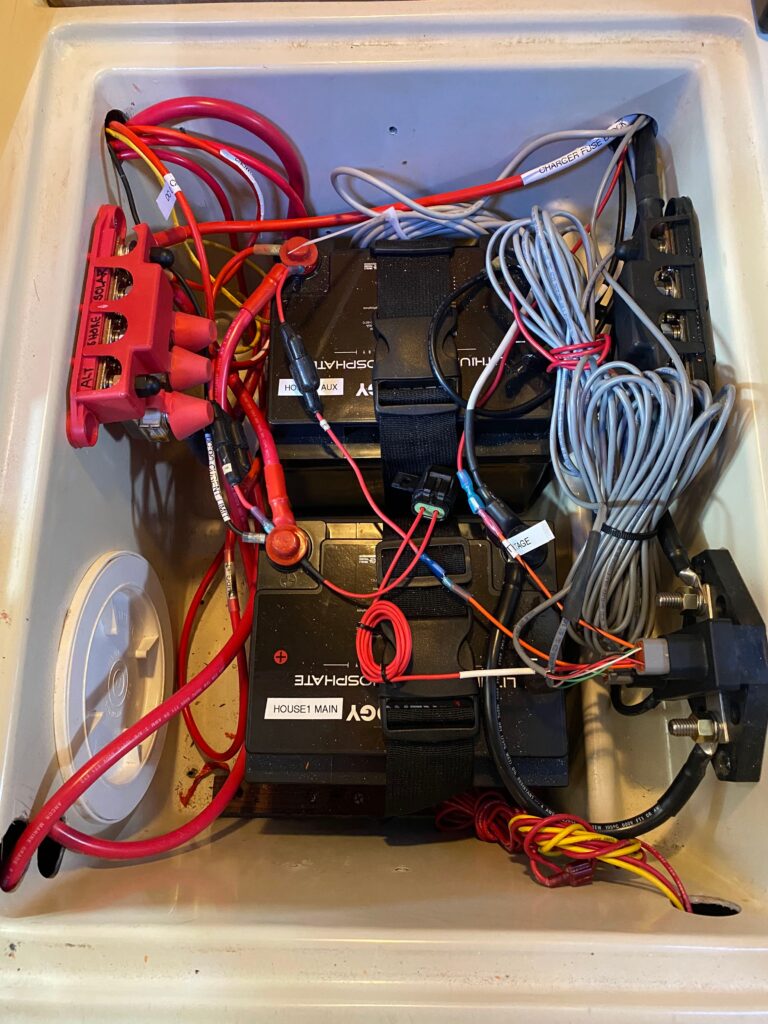
By not placing the starter in the battery compartment, I was left with an abundance of space for my new Renogy lithium. I adjusted the location of some wooden rails at the bottom of the compartment that a previous owner had installed. I added some nylon webbing with buckles to keep the units from flying around in case I put the spreaders in the water.
I also located my new positive and negative distribution posts here, and I was glad to have the extra space afforded by the compact batteries.
I utilized Blue Sea Marine Rated Battery Fuse Blocks for the cables supplying power from the Alternator, Solar, and A/C Shore Power Charger.
700W DC-to-AC Sine Wave Inverter
This inverter was something of an afterthought purchase that the Amazon algorithm convinced me was a good “while you are at it” item to purchase.
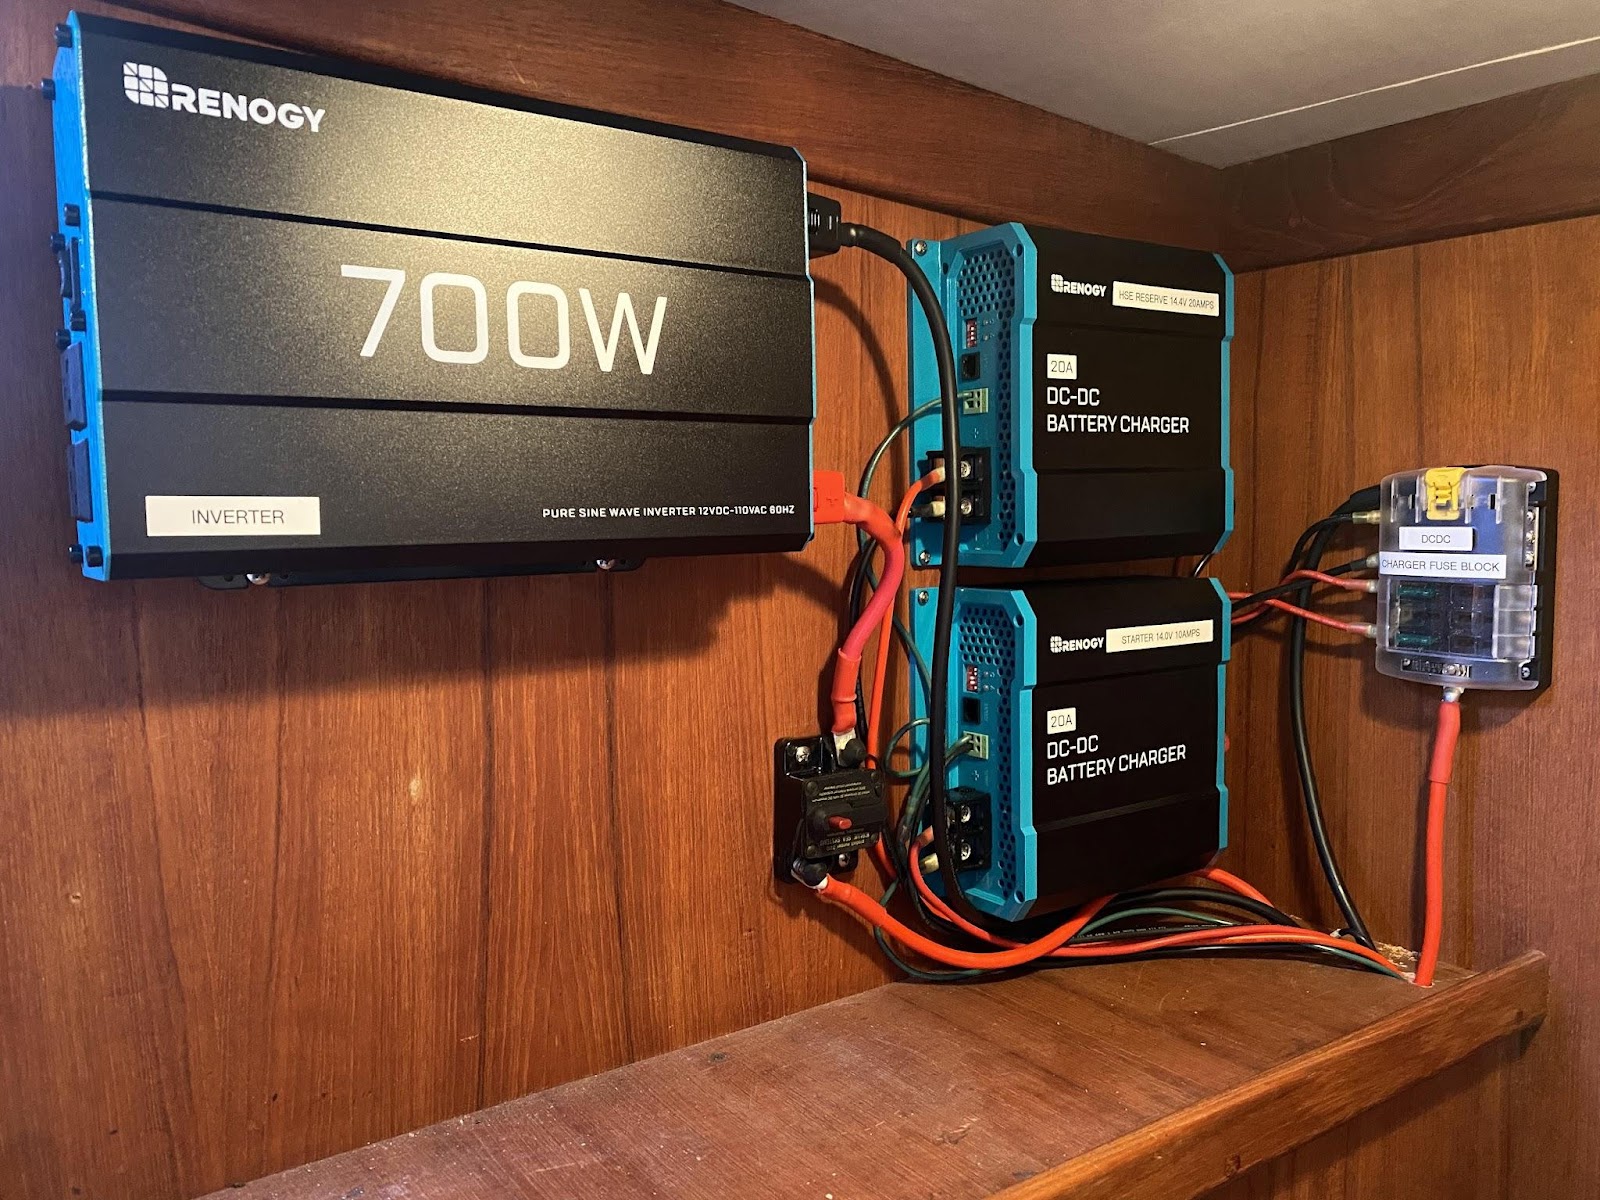
It is not terribly expensive ($130), and as I was working through the installation process, I realized that if one of my DC-DC chargers attached to my starter and house reserve batteries fails, I could plug in a small AC lithium wall charger to the Inverter and use that as a backup charging solution to transfer electricity between batteries.
I will also be able to run small AC appliances/devices.
Lithium Battery Management System Shut-Offs
One of my latent concerns about moving from lead acid to lithium batteries is the fact that the lithium batteries all contain self-protecting battery management systems that turn the battery off instantaneously if conditions such as overcharging or overcurrent occur. If a user introduces such inadvisable conditions and the battery turns itself off, how is one meant to turn the battery back on? (There is no switch).
While installing one part of my new system, I managed to accidentally short-circuit a battery (knocking a positive cable onto a negative post with both attached to the battery) and this triggered the BMS-shut-off of the battery. Following instructions, I disconnected the battery posts for some 5 minutes and re-connected the cables. The battery came back to life readily.
The other condition for a BMS shut-off is if power is left on too long and the voltage drops excessively. This is a different condition than the short-circuit example above because the battery has lost most of its stored energy. The way to wake the battery back up is to apply a very low small current charge at a low voltage and slowly bring the system back to life. This act can be achieved with a solar controller and with some other lithium specific chargers. My Renogy solar controller will be able to perform this function, as would the Noco Genius plug-in-charger I could use via my 700W inverter.
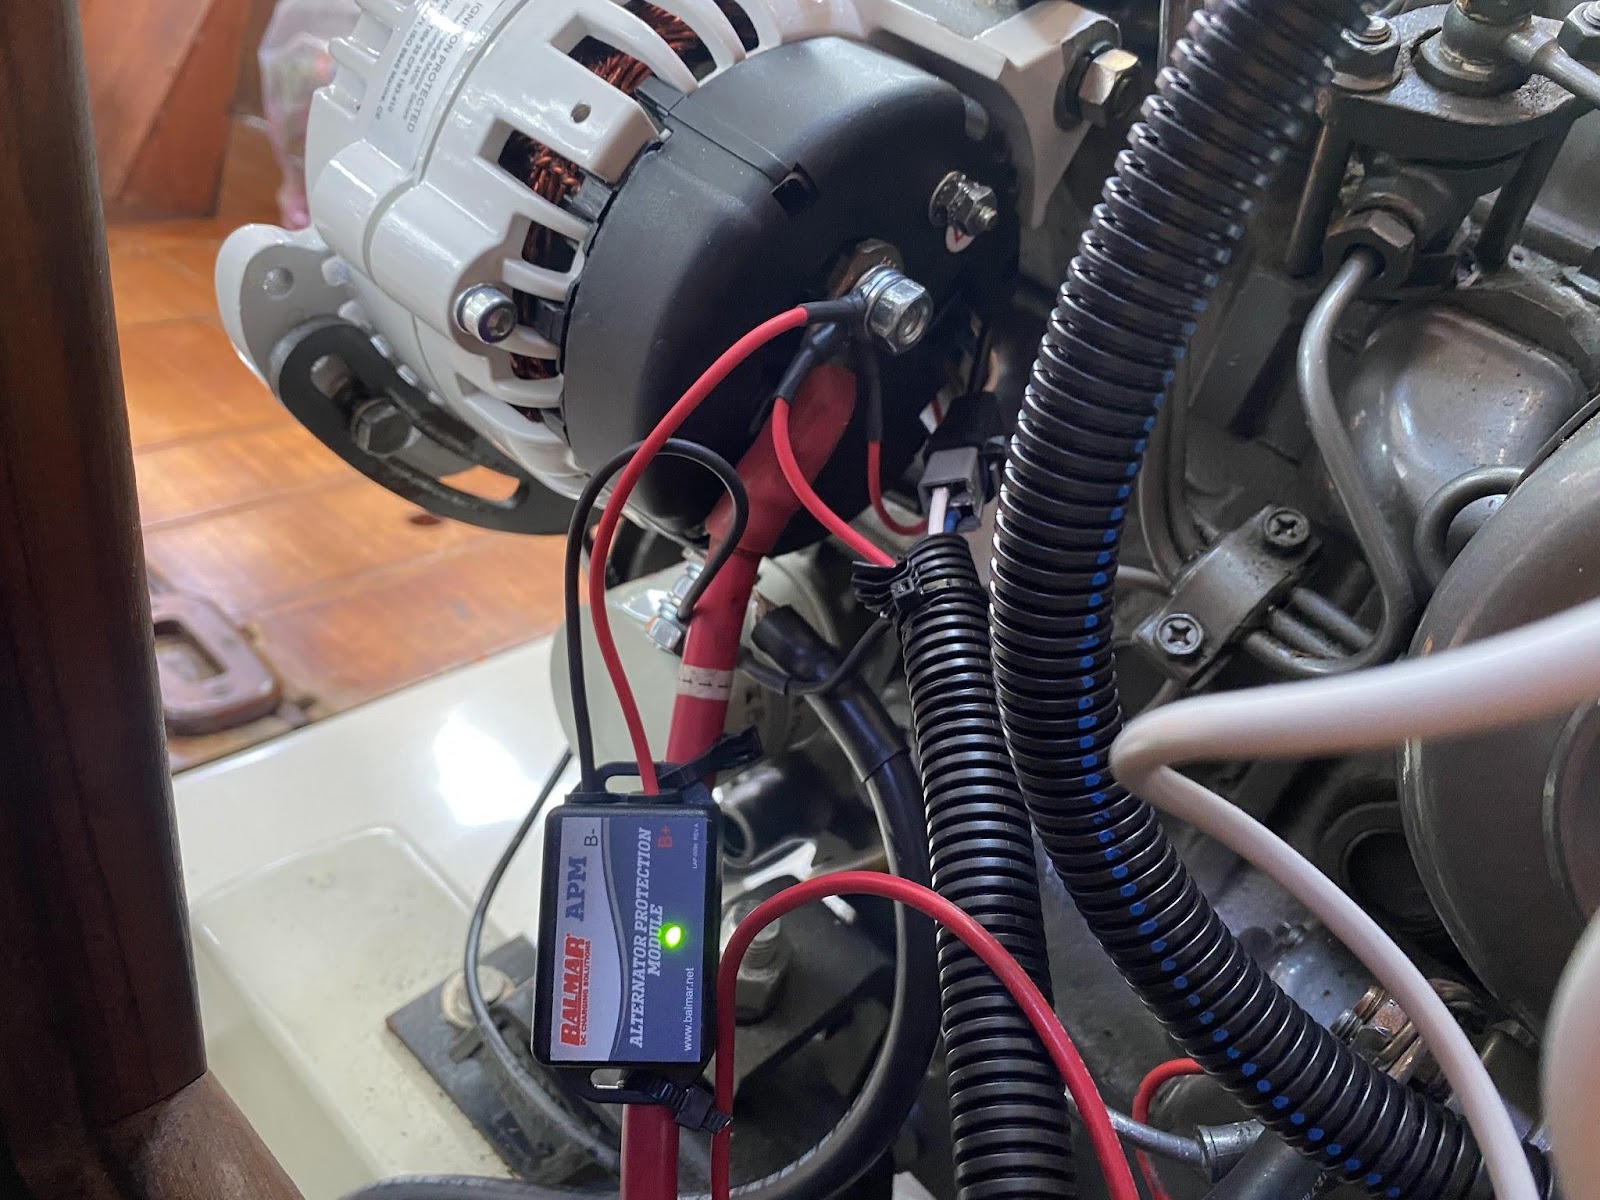
In the event I inadvertently manage to cause my House Primary’s Battery Management System to shut the battery down while the alternator is running, the alternator will have lots of voltage with nowhere to go. This kind of spike can damage an alternator’s diodes. Many installers keep a lead-acid battery attached to a system installation to absorb this kind of voltage burst. I purchased a Balmar Alternator Protection Module to serve the same purpose and it has a blinking LED light to reassure a user the module is on duty.
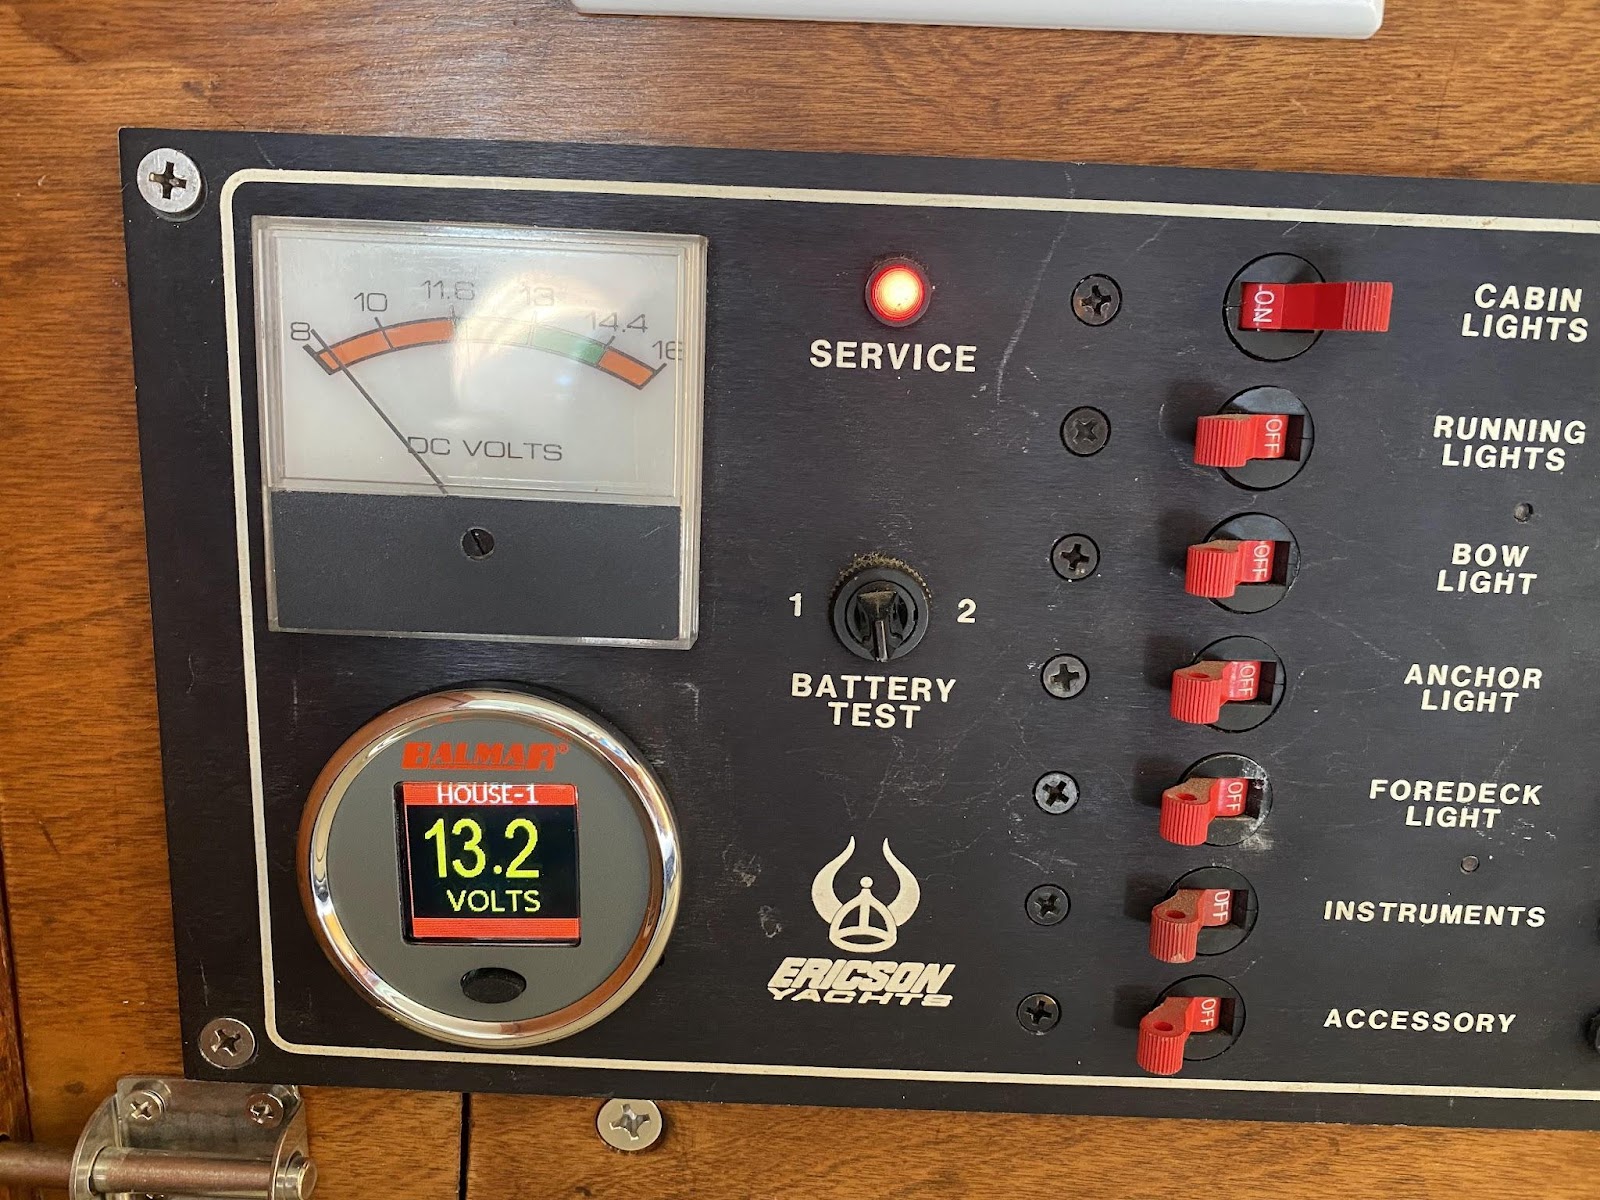
Balmar SG-200 Battery Monitor Display
With some encouragement from a metal-grinding drill bit, I was able to fit in my Ericson factory aluminum dash panel the little screen Balmar battery monitor display.
Total System Costs
Here is the line-item budget for what I spent on the project:
| Item | Supplier | Cost |
| Balmar 60 Series 70 amp Alternator | PKYS | $614 |
| Balmar Alternator Protector | PKYS | $69 |
| Balmar MC618 Alternator Regulator | Defender | $298 |
| Balmar Alternator Temp Sensor | Defender | $35 |
| Balmar Battery Temp Sensor | PKYS | $48 |
| Balmar Bluetooth Gateway | PKYS | $50 |
| Balmar MC618 Connector Cord | Amazon | $60 |
| Balmar Network Cord | PKYS | $50 |
| Balmar SG-200 + SmartShunt kit | Defender | $215 |
| Balmar iOS app | AppStore | $0 |
| Renogy 50aH Battery | Amazon | $318 |
| Renogy 50aH Battery | Amazon | $318 |
| Renogy 700W Inverter | Amazon | $128 |
| Renogy 100W Solar Panel Kit | Amazon | $280 |
| Renogy DC DC Charger 20amp | Amazon | $99 |
| Renogy DC DC Charger 20amp | Amazon | $99 |
| Nylon Straps to hold batteries in place | Amazon | $12 |
| BlueSea Fuse Holders (total of 3) | Amazon | $57 |
| Blue Sea Marine Fuses (total of 3) | Amazon | $51 |
| Cantilever Crimper and Cutter | Amazon | $35 |
| Extra Deutsch Connectors for Balmar Network | Amazon | $20 |
| Noco NFP14 Starter Battery | Amazon | $105 |
| Noco Booster Jump Battery | Amazon | $100 |
| Noco Genius 5amp plug-in charger | Amazon | $69 |
| Power Distribution Posts | Amazon | $40 |
| Wires and Cable | West Marine/Amazon | $300 |
| Lugs and Terminals | West Marine/Amazon | $120 |
| Installation Labor | DIY | 30 hours |
| Total | $3,590 |
Tools- Equipment-Tips
Most of the time involved with the physical installation of this project is related to building and routing wires to run power back and forth. By “building wires” I mean installing appropriate lugs and terminal fittings at the ends. For making big battery cables I was very glad to have on hand a cantilevered crimping tool with a set of cutters I bought from Amazon for $35.
Conclusion
I have built a system that was complex to install, but should be simple to operate. I should never have to worry about what battery is being charged, because from a charging perspective it is all one bank when power is being supplied to the positive distribution post. The DC/DC chargers set the appropriate volts and amps for the auxiliary reserve and starter batteries. The primary charging sources (alternator, solar, charger) are set to charge the house primary battery appropriately.
One advantage I have gained is quick-charging. On this note, it is very unlikely that I will obtain the 2,000 cycles advertised by Renogy. The manual states that a full charge cycle should take about 7 hours, with the assumption that one is charging at a 0.2 “C” value. For my 50aH battery that means charging at 10amps. Alternatively, with my 70amp alternator, I could charge at the 50amp max charge current stated by Renogy and get back to a 90% state of charge in less than an hour for my house primary battery. In the scope of things that are expensive for sailboats, even if I wipe out this battery in two years, the $318 purchase price was not exorbitant and will have saved me lots of motoring-with-alternator time.
The charging current for my house auxiliary/back-up/reserve battery maxes out at 20amps (the highest output of the DC DC charger I am using). This identical 50aH battery will probably last longer than the primary battery I can blast-charge with 50amps. Perhaps I will switch the boxes after a year or two.
The 500 cranking amp, 4aH starter battery is similarly protected with only a 10amp charge rate. I hope it will last for some time.